
Tips To Improve Your Defensive Shooting
The term “Defensive” means “used or intended to defend or protect”. So Defensive Shooting means using a firearm to defend or protect yourself or family. If someone is shooting at you, you are likely going to be pulling the trigger as fast as you physically can. Unfortunately, many gun owners rarely practice the shooting skills they would need or use in a gun fight. Civilian gunfights typically happen at close range (3-5 yards) happen very quickly (3-5 seconds) and require 3-5 rounds, so we should probably practice this type of shooting. Here are 3 tips to help you shoot faster and more accurately.
- Recoil Mitigation
You can only shoot and hit your target as fast your gun completes the recoil cycle. No matter how big or strong you are, or how good a shooter you are, your gun will recoil during the firing cycle. The muzzle of gun will flip up (and possibly left or right) and the energy or momentum will be transferred to the shooter’s body. However, under the stress of a gunfight, it may be physically impossible for you to slow your trigger finger down enough to let the gun complete the recoil cycle, especially if you have not learned how to mitigate recoil. If we assume our defensive encounter requires 3 shots and will be over in 3 seconds, that equals 1 shot per second, or splits as we call them. If we include some time to get the gun into the fight by either drawing from the holster or raising the gun from low ready we may use up 1.5 – 2 seconds, which means we are looking at shot splits of .4 seconds. Dave Spaulding with Handgun Combatives is fond of using .33 splits as a good benchmark for solid recoil mitigation. In one of his latest videos he breaks down his new 9 in 9 drill which is worth watching. So how do we mitigate recoil?
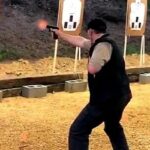
A consistent grip and solid stance are the two most important aspects to mitigate recoil. A proper grip not only helps reduce muzzle flip, it also helps divert the muzzle straight up instead of left or right. As you can see in the picture below, the firearm is going to travel the path of least resistance. If there is less resistance on the left side of the gun, it will recoil up and to the left. If there is less resistance on the right hand side, the muzzle will lift up and to the right. With a 360 degree grip around the gun the muzzle will flip straight up. Combine this while maintaining a solid/consistent grip pressure (before, during and after the shot) and wrists locked, the gun’s muzzle rise will be reduced significantly and the gun will snap right back into place after the recoil cycle.

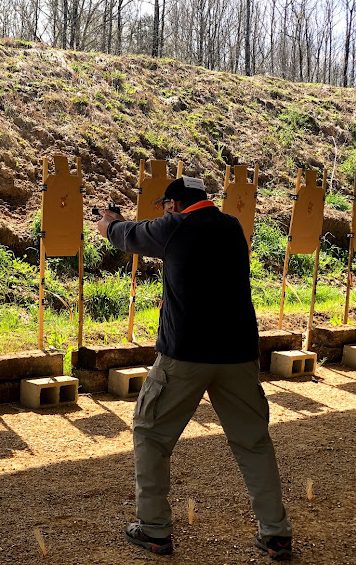
The second portion of recoil mitigation includes a proper stance. A solid stance allows your body to absorb the energy without disturbing your upper torso. A good stance includes feet positioned about shoulder width apart, knees slightly bent, your dominate or strong side foot about a half step back, and weight shifted slightly forward or what is sometime described as “nose over toes”. This stance (as seen in the picture below) helps prevent you from rocking backwards during the recoil cycle and also increases the ability to move if necessary.
2. Steady Head with Front Sight or Target Focused
Once we have perfected the grip and stance, the gun should “snap back” to the point it was before the recoil cycle began. The next step is to resist the urge to look for where the previous shot impacted the target, which is very common for new shooters. Not only does this slow our shot to shot time down, but takes our eyes off our sights or away from our optic, which means we have to readdress the relationship between our firearm and our target, again slowing us down. If you maintain a steady head position, you will be able to pick up the front sight or red dot optic as it snaps back onto the target. Watch the slow motion video to see an example of recoil mitigation and the relationship between the head and the firearm.
3. Trigger Reset In Recovery
With a good grip, stance, and sight picture in place, we now have to work on resetting the trigger quickly so that by the time the gun snaps back into place we have already let the trigger reset and have prepped it for the next shot. There is a good bit of debate on exactly how to reset/or prep the trigger during the recoil cycle, so if you have time, I encourage you to read “The Trigger Reset Question” article by Lee Weems of First Person Safety. He clearly lays out the difference between reset in recovery and prepping the trigger during recoil. Here is a short 5 minute video from our friend Dave Spaulding on exactly what trigger reset in recover looks like, and how you can incorporate it into your next practice session.
Putting It All Together
So once have put all the pieces together, what kind improvement or performance increase can you expect? Dave Spaulding uses .33 second splits (about the blink of an eye) as examples of good recoil mitigation and trigger reset in recovery. Some of the best shooters in the world are capable of split times about half that (about .15 seconds) but with regular and consistent practice most shooters can expect to be in the .2 to .25 range with relatively good accuracy. The key word in that statement is consistent. Every gun has different recoil impulse, trigger reset point and sometimes even different sights. So one of the best ways to get better is to shoot the same gun, or at least make of gun for defensive practice at the range. If you spend an hour learning the “feel” and seeing the sights of one gun bounce up and down during recoil, and then switch to another gun your body has to “unlearn” and then “re-learn” what you had accomplished with the previous gun. This doesn’t mean you can’t have or shoot other guns, but by using your defensive guns during deliberate defensive shooting practice, you will begin to engrain what you feel and see into your brain. Once you have reached a level of automaticity where you don’t have to consciously think about feeling the trigger reset or seeing the sights snap back on to the target you will see a dramatic increase in your Defensive Shooting!
If your only formal firearms training was in a basic “Permit to Carry” class or some shooting lessons from the “gun person” in your family or circle of friends, chances are you were only exposed to the fundamentals of shooting. If you intend to have and/or use a handgun for self-defense, then it is essential that you learn and practice the skills necessary to prevail in a gunfight. Take a few minutes to once again watch a video from our friend Dave, as he describes the essential aspects of a combative pistol program.